
행복한 하루
Raspberry Pi – Linux Device Driver 만들어 보기-3 (장치 번호 자동 생성과 읽기 쓰기 함수 구현) 본문
Raspberry Pi – Linux Device Driver 만들어 보기-3 (장치 번호 자동 생성과 읽기 쓰기 함수 구현)
변화의 물결 2022. 10. 12. 15:43
안녕하세요.
디바이스 드라이버가 일을 하도록 간단한 작업을 시켜보도록 하겠습니다. 그리고 이전에 장치 번호를 수동으로 입력했는데, 이번에는 알아서 장치 번호가 생성되도록 하는 내용입니다.
1. 사전 준비
- 이전에 했던 day2 디렉터리를 day3으로 복사를 합니다.
pi@raspberrypi:~/DriverStudy $ cp -r day2 day3
pi@raspberrypi:~/DriverStudy $ cd day3
- 작업하려는 내용에 맞게 파일 이름을 바꿉니다. 그리고 Makefile의 내용도 변경해줍니다.
pi@raspberrypi:~/DriverStudy/day3 $ mv dev_nr.c read_write.c
pi@raspberrypi:~/DriverStudy/day3 $ vim Makefile
obj-m += read_write.o2. 소스 구현
- 문자열 데이터를 받기 위해서 char 배열과 배열 위치를 포인터 변수를 생성합니다.
static char buffer[255];
static int buffer_pointer;
- read, write 함수를 구현을 합니다. (User 프로그램에서 드라이버로 Read, Write 할 때 호출되는 함수를 만듭니다.)
- 복사할 데이터 수를 확인한 후 커널에 있는 저장되어 있는 버퍼를 내용을 복사해서 읽어 갈지(copy_to_user), 사용자 영역에 있는 데이터를 커널 영역 버퍼에 저장할지(copy__from_user)에 따라 read와 write 함수로 구현됩니다.
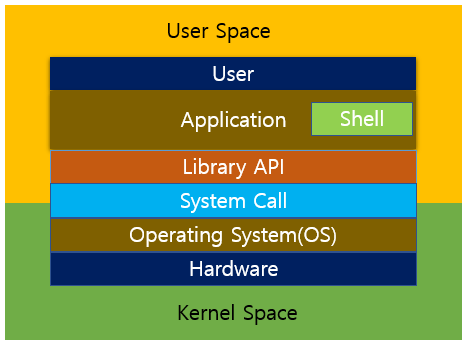
<커널 영역>
- 커널이 작업하는 영역으로 CPU 작업 스케줄이나 하드웨어를 제어하는 디바이스 드라이버와 메모리를 관리하는 기능 등을 수행합니다.
<사용자 영역>
- 사용자 영역은 일반 프로그램이 실행되는 영역이며 커널 작업을 실행시키기 위해서는 시스템 콜을 사용해야 합니다.
/*
 * @brief Read Data out of the buffer
 */
static ssize_t driver_read(struct file *File, char *user_buffer, size_t count, loff_t *offs) {
        int to_copy, not_copied, delta;

        /* Get amount of data to copy */
        to_copy = min(count, buffer_pointer);

        /* Copy data to User Area */
        not_copied = copy_to_user(user_buffer, buffer, to_copy);

        /* Calculate data */
        delta = to_copy - not_copied;

        printk("Test Driver Read Function \n");

        return delta;
}

/*
 * @brief Write Data out of the buffer
 */
static ssize_t driver_write(struct file *File, const char *user_buffer, size_t count, loff_t *offs) {
        int to_copy, not_copied, delta;

        /* Get amount of data to copy */
        to_copy = min(count, sizeof(buffer));

        /* Copy data from User Area */
        not_copied = copy_from_user(buffer, user_buffer, to_copy);
        buffer_pointer = to_copy;

        /* Calculate data */
        delta = to_copy - not_copied;

        printk("Test Driver Write Function \n");

        return delta;
 }
- 디바이스 드라이버에서 호출할 수 있게 콜백(Callback) 함수와 연결해줍니다. 위에서 만든 함수를 콜백 함수로 등록합니다.
static struct file_operations fops = {
        .owner = THIS_MODULE,
        .open = driver_open,
        .release = driver_close,
        .read = driver_read,
        .write = driver_write
};
- 커널 내부적으로 캐릭터 디바이스를 표현하기 위한 cdev구조체를 선언합니다. 그리고 udev를 통한 동적인 장치 파일 생성/제거를 위해서 클래스와 장치명을 선언해줍니다.
/* Variables for device and device class */
static dev_t my_device_nr;
static struct class *my_class;
static struct cdev my_device;

#define DRIVER_NAME "testDriver"
#define DRIVER_CLASS "TestModuleClass"
- 기존 __init 함수 driver_init 이름을 ModuleInit로 변경한 후 기존 소스에서 수동으로 장치 번호를 할당하는 부분을 동적으로 생성하는 것으로 바꿉니다.
- alloc_chrdev_region()의 my_device_nr에 장치 번호가 할당되어 되며, ‘0’ 위치에 인자의 의미는 디바이스에 할당되는 minor 첫 번째 번호, ‘1’ 위치에 인자의 의미는 minor 디바이스의 개수이고, 디바이스 이름을 넣으면 됩니다.
- cdev 구조체를 초기화하고, 파일 제어를 위한 콜백 구조체를 등록합니다. 그리고 마지막으로 cdev_add() 함수를 이용해서 cdev구조체를 커널에 등록합니다.
static int __init ModuleInit(void) {
        int retval;

        printk("Hello, Driver dev_nr!\n");

        /* Allocate a device nr */
        if( alloc_chrdev_region(&my_device_nr, 0, 1, DRIVER_NAME) < 0) {
                printk("Device Nr. Cound n9ot be allocated!\n");
                return -1;
        }

        printk("read_write - Device Nr. Major: %d, Minor : %d was registered!\n", my_device_nr>>20, my_device_nr&0xfffff);

        /* Create Device Class */
        if((my_class = class_create(THIS_MODULE, DRIVER_CLASS)) == NULL) {
                printk("Device class can not created!\n");
                goto ClassError;
        }

        if(device_create(my_class, NULL, my_device_nr, NULL, DRIVER_NAME) == NULL) {
                printk("Can not create device file!\n");
                goto FileError;
        }

        /* Initialize device file */
        cdev_init(&my_device, &fops);

        /* Registering device to kernel */
        if(cdev_add(&my_device, my_device_nr, 1) == -1) {
                printk("Registering of device to kernel failed!\n");
                goto AddError;
        }
        return 0;

AddError:
        device_destroy(my_class, my_device_nr);
FileError:
        class_destroy(my_class);
ClassError:
        unregister_chrdev(my_device_nr, DRIVER_NAME);
        return -1;
}
- __exit 함수 driver_exit() 함수 이름도 ModuleExit로 변경 후 동적 할당 함수에 맞게 함수들을 변경해줍니다.
static void __exit ModuleExit(void) {
        cdev_del(&my_device);
        device_destroy(my_class, my_device_nr);
        class_destroy(my_class);
        unregister_chrdev(my_device_nr, DRIVER_NAME);
        printk("Bye Driver Day3\n");
}
- 변경된 __init, __exit 함수 이름으로 바꿔줍니다.
module_init(ModuleInit);
module_exit(ModuleExit);
3. 컴파일
- 수정한 내용을 컴파일해서 확인합니다. Warning이 조금 나오는데 이번에는 무시하고 드라이버 파일이 생성된 것을 확인합니다. Error 나온 것은 오타 등 확인해서 수정해야 합니다.
pi@raspberrypi:~/DriverStudy/day3 $ make
4. 드라이버 작동 확인
- 생성한 드라이버 커널에 추가합니다.
pi@raspberrypi:~/DriverStudy/day3 $ sudo insmod read_write.ko
- 장치 드라이버 디렉터리에 자동으로 생성된 것을 확인할 수 있습니다. Major 번호는 다를 수 있습니다.
pi@raspberrypi:~/DriverStudy/day3 $ ls -al /dev/testDriver
- 드라이버 장치에 read/write 권한을 줍니다.
pi@raspberrypi:~/DriverStudy/day3 $ sudo chmod 666 /dev/testDriver
- 드라이버 장치에 문자열 정보를 전달해봅니다.
pi@raspberrypi:~/DriverStudy/day3 $ echo "Send Message Test" > /dev/testDriver
- 드라이버 장치에 문자열 정보 확인해봅니다.
pi@raspberrypi:~/DriverStudy/day3 $ head -n 1 /dev/testDriver
- 커널에서 드라이버를 제거합니다.
pi@raspberrypi:~/DriverStudy/day3 $ sudo rmmod read_write.ko
- 최종 진행된 커널 메시지를 확인합니다.
pi@raspberrypi:~/DriverStudy/day3 $ dmesg | tail -n 10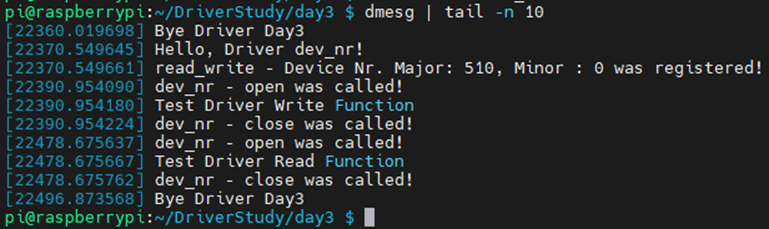
이전 내용과 다른 게 자동으로 장치 드라이버 번호를 할당하는 등 해야 할 디바이스 드라이버를 사용하는 입장에서는 일이 줄어든 것을 알 수 있었습니다.
감사합니다.
<참고 사이트>
1. Let's code a Linux Driver - 3: Auto Device File creation & Read- Write-Callbacks
https://www.youtube.com/watch?v=tNnH-YiY_1k&list=PLCGpd0Do5-I3b5TtyqeF1UdyD4C-S-dMa&index=4
2. 캐릭터 디바이스 드라이버
3. 디바이스 드라이버란
4.User space and kernel space
https://en.wikipedia.org/wiki/User_space_and_kernel_space
'RaspberryPi > DeviceDriver' 카테고리의 다른 글
| Raspberry Pi – Linux Device Driver 만들어 보기-6 ( PWM Driver ) (0) | 2022.11.16 |
|---|---|
| Raspberry Pi – Linux Device Driver 만들어 보기-5 ( CLCD Driver 만들기-HD44780 ) (0) | 2022.11.09 |
| Raspberry Pi – Linux Device Driver 만들어 보기-4 ( GPIO Driver 만들기 ) (0) | 2022.11.03 |
| Raspberry Pi – Linux Device Driver 만들어 보기-2 (장치 번호와 접근해보기) (1) | 2022.07.18 |
| Raspberry Pi – Linux Device Driver 만들어 보기-1 (module 형태 만들기) (0) | 2022.06.12 |


