
행복한 하루
Raspberry Pi – Linux Device Driver 만들어 보기-5 ( CLCD Driver 만들기-HD44780 ) 본문
Raspberry Pi – Linux Device Driver 만들어 보기-5 ( CLCD Driver 만들기-HD44780 )
변화의 물결 2022. 11. 9. 13:41
안녕하세요.
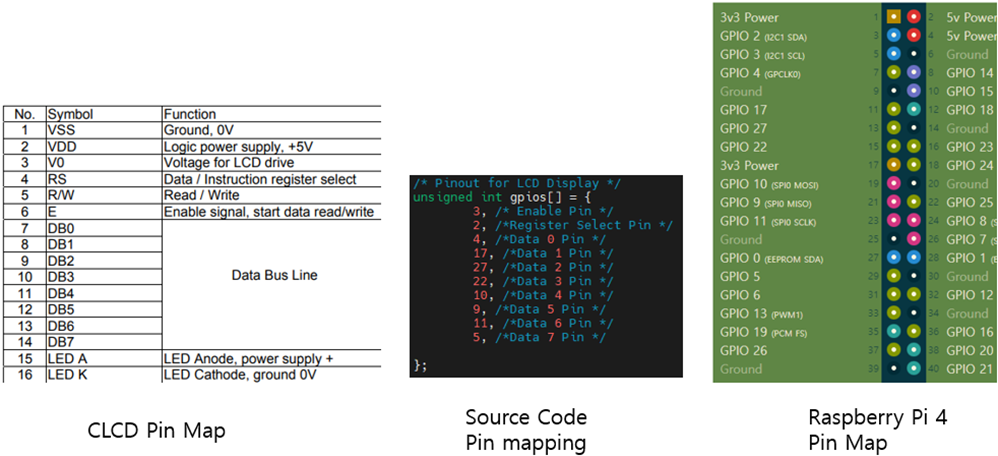
이번 내용은 Character LCD 제어하는 드라이버를 만드는 내용입니다. 참조 사이트 동영상에는 HD44780 제품을 사용하는 내용인데, 제가 테스트한 것은 조금 다른 제품이지만, 기본적인 CLCD 제어하는 칩이 비슷하다 보니 명령어가 동일하게 작동하였습니다.
2x16 CLCD를 가지고 있다면 핀 맵을 보시고 테스트하시면 됩니다. 그러나 현재 제품은 데이터 8핀을 사용하는 제품이므로 선 연결이 조금 깔끔하지 않을 수 있습니다.
1. 사전 준비
- CLCD 제어도 GPIO 기반이기 때문에 기존 내용을 사용하도록 합니다.
- 이전에 내용인 day4_gpio 디렉터리를 day5_clcd로 복사를 합니다.
pi@raspberrypi:~/DriverStudy $ cp -r day4_gpio day5_clcd
- 새로운 프로젝트를 위해 작업하기 위한 파일 이름으로 바꿉니다. 그리고 Makefile의 obj 파일 리스트에서도 바꿔줍니다.
pi@raspberrypi:~/DriverStudy/day5_clcd $ mv gpio_driver.c lcd_driver.c
pi@raspberrypi:~/DriverStudy/day5_clcd $ vim Makefile
2. 하드웨어 확인
- Raspberry Pi 4의 많은 GPIO 핀을 사용하고 있습니다. Original Raspberry Pi 4를 사용해도 됩니다. 테스트하기 위해서 다른 캐리어 보드와 CM4 모듈로 테스트해보았습니다.
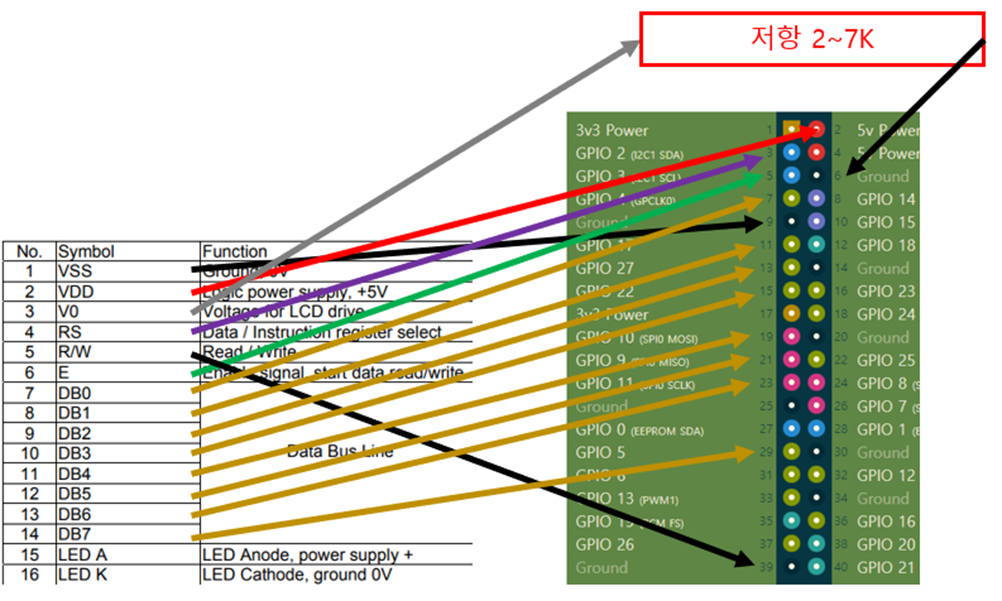
- 사용할 핀 맵을 확인 합니다.
- Vo 단자에 가변저항 10K 혹은 2K ~ 7K 저항을 GND에 연결해주면 선명하게 볼 수 있습니다. 바로 GND로 바로 연결하면 글자가 진해져서 보이지 않습니다.
- R/W핀은 GND를 연결해서 항상 WRITE 신호로 만들어 놓습니다.
- 핀을 연결하기 위한 정보로 예를 들어 CLCD RS 핀이라고 한다면, Source Code를 GPIO 2번과 연결시켜 놓았다는 것을 알 수 있고 실제 RaspberryPi GPIO 2 핀에 CLCD RS 핀을 연결해주면 됩니다.
- 보기가 힘들 것 같은데요, 대략 GPIO 핀을 데이터로 사용하면 아래와 같이 연결하면 됩니다. 그래서 최근에는 I2C 모듈이 부착된 CLCD 모듈을 사용하거나 4Bit Data를 사용하도록도 하고 있습니다.
3. 소스 수정
- lcd_driver.c 수정합니다. 기존 내용에 필요 없는 부분은 지우기도 하기 때문에 아래 소스는 추가되는 내용이 '대충 이렇군' 보시고 첨부한 파일로 확인하시면 됩니다.
- msleep() 함수를 사용하기 위해서 해더 파일을 추가해줍니다.
#include <linux/delay.h>
- CLCD에 한 줄을 저장해 놓기 위한 변수와, GPIO를 핀 맵을 배열을 전역 변수로 선언합니다.
/* LCD char buffer */
static char lcd_buffer[17];

/* Pinout for LCD Display */
unsigned int gpios[] = {
        3, /* Enable Pin */
        2, /*Register Select Pin */
        4, /*Data 0 Pin */
        17, /*Data 1 Pin */
        27, /*Data 2 Pin */
        22, /*Data 3 Pin */
        10, /*Data 4 Pin */
        9, /*Data 5 Pin */
        11, /*Data 6 Pin */
        5, /*Data 7 Pin */
};

#define REGISTER_SELECT gpios[1]
- 데이터를 전달했다는 신호를 함수로 구현합니다.
/* @brief generates a pulse on the enable signal */
void lcd_enable(void) {
        gpio_set_value(gpios[0], 1);
        msleep(5);
        gpio_set_value(gpios[0], 0);
}
- 명령어 데이터와 문자열 데이터 보내는 함수를 구현합니다. 실제적으로는 RS이 0, 1의 차이입니다.
/*
 *  @brief : send a data to the LCD
 *  @Param : command to send
*/
void lcd_command(uint8_t data) {
        gpio_set_value(REGISTER_SELECT, 0);  //RS to Instruction
        lcd_send_byte(data);
}

/*
 *  @brief : send a data to the LCD
 *  @Param : data to send
*/
void lcd_data(uint8_t data) {
        gpio_set_value(REGISTER_SELECT, 1);  //RS to Data
        lcd_send_byte(data);
}
- 한 글자당 8bit로 생각해서 GPIO Data핀에 맞게 시프트(Shift) 연산으로 0, 1 신호를 만들어 줍니다. (원하는 비트의 데이터를 가져오기 위해서 AND(&) 연산을 한 후 그 위치의 값을 다시 끝으로 시프트 시켜 그 값이 0, 1인지 파악해서 set_value 값으로 대입시키는 로직)
/*
 * @brief : Set the 8 bit data bus
 *  @param : Data to Set
*/
void lcd_send_byte(char data){
        int i;
        for(i=0;i<8;i++) {
                // +2 is Enable pin, Select Pin
                gpio_set_value(gpios[i+2], ((data) & (1<<i)) >> i);
        }

        lcd_enable();
        msleep(5);
}
- CLCD 는, Read 할 경우가 거의 없으므로 read() 함수 삭제하고, Write() 함수에 넘어온 문자열을 출력해주는 함수로 연결
/*
 * @brief Write Data out of the buffer
 */
static ssize_t driver_write(struct file *File, const char *user_buffer, size_t count, loff_t *offs) {
        int to_copy, not_copied, delta, i;

        /* Get amount of data to copy */
        to_copy = min(count, sizeof(lcd_buffer));

        /* Copy data from User Area */
        not_copied = copy_from_user(&lcd_buffer, user_buffer, to_copy);

        /* Calculate data */
        delta = to_copy - not_copied;

        /* Set the new data to the display */
        lcd_command(0x01);

        for(i=0;i<to_copy;i++)
                lcd_data(lcd_buffer[i]);

        printk("Test Driver Write Function \n");

        return delta;
}
- ModuleInit() 함수에서 GPIO 핀 초기화 및 CLCD 내용 추가
static int __init ModuleInit(void) {
        int i;

        char *names[] = {"ENABLE_PIN", "REGISTER_SELECT",
                "DATA_PIN0", "DATA_PIN1", "DATA_PIN2", "DATA_PIN3", "DATA_PIN4", "DATA_PIN5", "DATA_PIN6", "DATA_PIN7"};
        char text[] = "Hello World!";

        printk("Hello, LCD Driver.\n");
 // ... 기존 코드 중간 생략
        /* Initialize GPIOs */
        printk("lcd-driver -GPIO Init \n");
        for(i=0;i<10;i++){
                if(gpio_request(gpios[i], names[i])) {
                        printk("lcd-driver - Error Init GPIO %d\n", gpios[i]);
                        goto GpioInitError;
                }
        }//for

        printk("lcd-driver - Set GPIOs to output\n");
        for(i=0;i<10;i++){
                if(gpio_direction_output(gpios[i], 0)) {
                        printk("lcd-driver - Error setting GPIO %d to output\n", i);
                        goto GpioDirectionError;
                }
        }//for

        /* Init the display */
        lcd_command(0x30); //Set the display for 8 bit data interface
        lcd_command(0xf);  //Turn display on, turn cursor on, set cursor blinking
        lcd_command(0x1);  //Clear Display

        for(i=0;i<sizeof(text)-1;i++)
                lcd_data(text[i]);
return 0;

GpioDirectionError :
        i=9;
GpioInitError :
        for(;i>=0;i--)
                gpio_free(gpios[i]);
- 할당받은 GPIO 핀을 해제해줍니다.
/**
 * @brief This function is called, when the module is removed from the kernel
 */
        lcd_command(0x01);

        for(i=0;i<10;i++) {
                gpio_set_value(gpios[i], 0);
                gpio_free(gpios[i]);
        }
// ... 기존 코드 중간 생략
}
- 원하는 비트의 데이터를 가져오기 위해서 AND(&) 연산을 한 후 그 위치의 값을 다시 끝으로 시프트 시켜 그 값이 0, 1인지 파악해서 set_value 값으로 대입시키는 약간 복잡한 로직 들어 있음
/* @brief : Set the 8 bit data bus
  @param : Data to Set
*/
void lcd_send_byte(char data){
           int i;
           for(i=0;i<8;i++) {
                     // +2 is Enable pin, Select Pin
                     gpio_set_value(gpios[i+2], ((data) & (1<<i)) >> i);
           }
           lcd_enable();
           msleep(5);
}

/* @brief : send a command to the LCD
  @Param : command to send
*/
void lcd_command(uint8_t data) {
           gpio_set_value(REGISTER_SELECT, 0);  //RS to Instruction
           lcd_send_byte(data);
}

/* @brief : send a data to the LCD
  @Param : command to send
*/
void lcd_command(uint8_t data) {
           gpio_set_value(REGISTER_SELECT, 1);  //RS to Data
           lcd_send_byte(data);
}
- write() 함수에 내용 추가합니다.
/* Set the new data to the display */
lcd_command(0x01);

for(i=0;i<to_copy;i++)
           lcd_data(lcd_buffer[i]);
- ModuleInit()에는 위에 만들어진 함수를 사용해 초기화합니다.
/* Init the display */
lcd_command(0x30); //Set the display for 8 bit data interface
lcd_command(0xf); //Turn display on, turn cursor on, set cursor blinking
lcd_command(0x1);

char text[] = “Hello World!”;
for(i=0;i<sizeof(text)-1;i++)
           lcd_data(text[i]);
- ModuleExit() 함수에는 GPIO 핀 사용 해제해주는 내용을 추가합니다.
 lcd_command(0x01);  // clear the display
 for(i=0;i<10;i++) {
                gpio_set_value(gpios[i], 0);
                gpio_free(gpios[i]);
 }
4. 컴파일 및 실행
- 참조 사이트 동영상을 직접 보면서 코딩을 따라 하면 오타와 실수하는 부분이 많이 생길 수 있습니다. 소스를 다운로드한 후 따라가면 좋을 듯합니다. 그러나 처음이라면 직접 타이핑해보면서 에러를 잡아가시면 이런 것 때문에도 에러가 발생하는구나 좋은 경험이 될 거라고 생각됩니다.
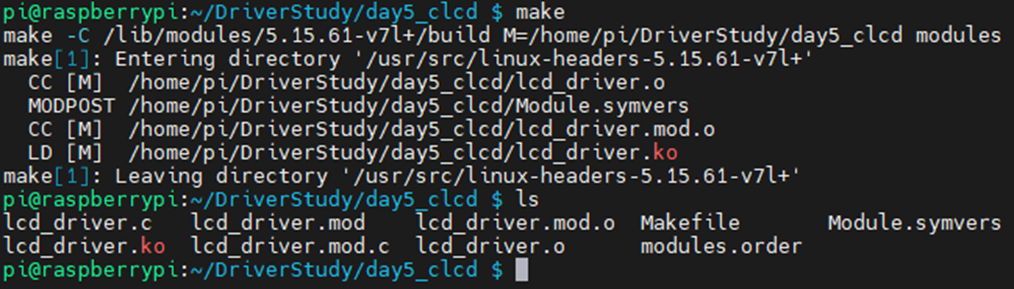
- 컴파일 끝나면 드라이버 파일이 생성됩니다.
- 드라이버 모듈 커널에 삽입하면 장치 파일이 생성되고 장치 파일에 접근할 수 있는 권한을 부여해주어야 합니다.
pi@raspberrypi:~/DriverStudy/day5_clcd $ sudo insmod lcd_driver.ko
pi@raspberrypi:~/DriverStudy/day5_clcd $ ls /dev/testCLCD -al
pi@raspberrypi:~/DriverStudy/day5_clcd $ sudo chmod 666 /dev/testCLCD
5. 작동 확인
- 출력하고 싶은 메시지를 장치 파일에 전달하면 메시지가 CLCD에 나타나는 것을 확인할 수 있습니다.
- 드라이버를 제거하면 화면이 깨끗해지는 것을 확인할 수 있습니다.
pi@raspberrypi:~/DriverStudy/day5_clcd $ echo Hello World > /dev/testCLCD
pi@raspberrypi:~/DriverStudy/day5_clcd $ sudo rmmod lcd_driver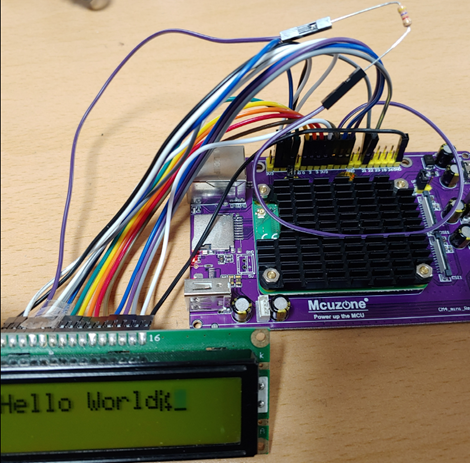
감사합니다.
<참고사이트>
1. Let's code a Linux Driver - 5: LCD text display driver (HD44780)
https://www.youtube.com/watch?v=HH3OOtJwBz4&list=PLCGpd0Do5-I3b5TtyqeF1UdyD4C-S-dMa&index=6
2. Raspberry Pi Pinout


